alvies.org is not going to become a DIY blog. Because, really, who would read it? Fewer people than read the content I put out now, for sure. But, with all of us spending so much more time at home over the last couple months, we’ve all needed an outlet, and I’ve been tinkering with things at home. In this case, I pulled out a bush from my front landscaping that had been dying since we bought the place and was left with a big open area. I’d never had a water feature at any home I’ve owned, so I decided this was the time.
Fountains are expensive, and I am cheap. So I decided that I wanted to shave as much cost as possible out of the project and build something myself. Further, I wanted something more minimalist that would contrast with my house, and doing everything from scratch gave me more flexibility there. Here’s what I used:
-
Two glazed ceramic planters, a larger and a smaller. I ended up paying more than I wanted to for these, having gotten them from Lowe’s, but I was unable to find anything I liked at resale shops or in private sales around me. These planters were to be stacked in a tower, with water flowing from the smaller down to the larger, and the pump raising the water back up.
-
One water pump; I got the smallest available pump from Harbor Freight Tools. I would have preferred to do this with a solar panel, but the cost of a sufficiently-powered one was more than I was interested in paying, especially for one that had a battery or capacitor system available to keep power to the pump during cloud cover or at night.
-
Half-inch inside-diameter vinyl tubing to pipe water from the lower to upper planter.
-
Lava rock and smooth river stones, also sourced from Lowe’s. The bulk of the lava rock allowed me to fill much of the planters to reduce the overall amount of water needed, but its porosity allowed the water to flow freely to the pump.
-
Three-quarter-inch galvanized pipe plugs, because ceramic planters are fired with drain holes so they don’t hold water forever, but that’s obviously not what I wanted them to do.
-
Various leftover materials from other projects, as you’ll see down the line.
Part One: Preparing the Planters
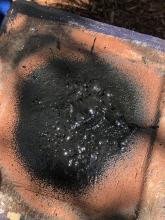
 The first thing that had to be done with the planters was to make them watertight. The glazing and firing process inherent to ceramic did most of that work for me, but the inclusion of drainage holes defeated the purpose at the most important point. So, those drain holes had to go. To do that, my first step was to plug the drain holes, which were about 7/8” diameter, with my galvanized plugs, and then seal them up. I chose masonry adhesive for this, which probably wasn’t the best option in retrospect, but it cured relatively quickly and allowed me to move on to the next part. You might ask why I plugged the smaller planter rather than leaving it temporarily to run the tubing, and I’ll get to that in a bit. Spoiler alert: I could have, and probably should have, and might well in the future.
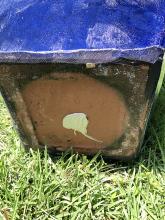
 For that, I grabbed a can of Flex Seal. It’s easy to use, but even after multiple coats, the larger planter was struggling to keep all of its water, and the larger planter was the important part. If small amounts of water were to leak from the bottom of the small planter, it wouldn’t be noticeable - however, if the bottom were to leak it could dry the pump and/or make a pretty big mess. After struggling with this for a couple days, a chat with a neighbor and a trip to my attic found a solution: I had a box of vinyl stick-on floor tiles from a project several years ago, and I was able to trim one to the proper size and adhere it to the bottom of the planter, over the top of the plug, with plenty of silicone. That sealed it all up quite tight.
Part Two: Assembling the Stand
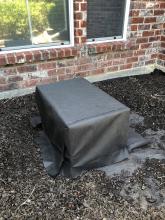
 As usual for me, I went into this project with limited planning. After I got the planters in the right place, I realized that my row of azalea bushes that border the area were taller than I realized, and the fountain wouldn’t be very visible at the height I had available, so it needed to be elevated. The previous owner of my house had used cinderblocks to line the back fence, and I’d dug out and given away most of them a couple summers back, but I had a baker's dozen or so left around. I used them to build a stand approximately two feet cubed, and covered it with landscaping fabric so it was less visible. This platform raised the fountain just enough to make it more visible from the street without overwhelming the large dining room windows behind it.
Part Three: Assembling the Planters
In order to make a stack of the planters, the large one needed supports inside to hold up the smaller one. I was able to do this with a couple remaining cinderblocks, which fit inside the planter’s footprint perfectly around the lump of the drain plug, and were tall enough to extend about 80% of the overall height of the planter. These were dirty and mossy, so I had to scrub them up and spray them down with mold remover before using them in the water.
 As an added bonus, the cells inside the cinderblocks were perfectly placed to put the body of the water pump and give it a safe place to sit. I filled in the lower half of the planter with some of my lava rock to provide more stability and fill up some of the open space of the large planter. Important note: if you, for some reason, want to follow this post and make your own fountain, wash the rocks well before dumping them in. All of the dust from shipping swirled up during the first fill-up of the fountain and made the water murky, and I was worried that it would also foul the pump. I had to take everything back apart and rinse the lava thoroughly before putting it back in.
With the lower planter full of block and rock, I was able to set the upper planter atop it. For this planter, I used some decorative bricks, also washed and sprayed with mold remover, that were used as decoration in the back yard near the cinderblocks I’d dug up. Around them, I used the rest of my washed lava rock to fill in almost to the top of the planter.
Part Four: The Pump
As mentioned before, the pump dropped right into place inside one of the cells of the cinderblocks in the lower planter, and the tubing and power cord came right out of the back. I first tried the pump with 1/4” inside-diameter tubing, but the water output was not sufficient for what I wanted the fountain to do, and I ended up replacing it with 1/2” ID tubing instead. The pump I chose draws only 8 watts, and pumps up to 158 gallons per hour, and was a steal for only $10. That said, I think if I were to work on this some more, I’d probably grab the pump the next size up from Harbor Freight, which draws twice the wattage but also increases the max flow up to 264 GPH. I ran the tubing up to the upper planter to eject water toward the front-facing side of the planter, in the hopes that it would run down and shimmer nicely as it did so.
Part Five: Filling, Running, and Upgrades
 To (literally) top it off before filling, I filled the top of the upper planter with smooth grey river rock, covering the tubing as I did so, and then filled both the top and bottom planters.
The fountain takes about 20 gallons of water to be at max fill, and once done, I plugged it in to see the effect. This was when I realized that the smaller tubing wasn’t sufficient, and I swapped it out for the larger tube. This reduced the pressure but spread the water out more evenly, but even that didn’t do much for the overall look. So, I went out and got a fountain package from Lowe’s with various heads to create other styles of water flow, and I settled on putting a vertical trumpet out of the top of the upper planter to make the water more visible. This is where I discovered that I might want to switch to a larger pump, as the small one doesn’t fire the trumpet off as evenly as it should due to the fact that it has to fight gravity for two and a half feet before reaching the outlet. For now, though, the flowing water catches the sun nicely in the mornings and can be heard from most of the front yard, and is way nicer to have around than a scraggly, dying bush.
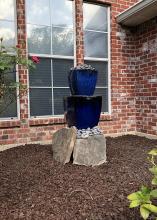
I finished the current look by using more river stones, and some slate stepping stones removed from an old walkway in the yard, to conceal the rest of the platform. Since, I’ve also planted baby bulbs from my Sago palms in the hopes that eventually they’ll grow more around the fountain and give it more ground cover. Once I make the step to go a little stronger with the pump, or redo the top planter so that the pump pipes up through the drain hole instead of around the back, I’ll have something that is just about exactly what I envisioned - not bad for virtually no planning whatsoever.
- Log in to post comments